React Microfrontend with Vite Federation
Introduction
Micro frontend is an architectural pattern inspired by Microservices. It allows developers to integrate multiple modules together to create a complete web application. Each micro frontend is an independent unit responsible for a specific function.
The basic components of Micro Frontend include:
- Host Application: Also known as the Shell app, this is the primary application that users interact with. It serves as the container for the micro frontends.
- Remote Application: These are the micro frontends themselves, which act as building blocks for the host application. Remote Applications are injected into the Shell app to form a complete web application.
Advantages
- Scalability: It is easy to add new business modules to the system (without affecting existing modules), and teams can work concurrently on separate modules without impacting each other.
- Flexibility: Micro frontends can be developed using different frameworks, as they ultimately just need to be built into static files (HTML, CSS, JavaScript) to be injected into the Shell app, forming a complete web application.
- Independence: Each micro frontend can be developed and deployed independently, reducing risks and enabling easy frequent releases.
- Maintainability: Smaller codebases are easier to maintain and refactor.
Implementation Methods for Micro Frontend
- iframe: This is a simple method but has limitations in communication (state management/session between Shell app and iframe) and customizing styles for iframe components.
- Web Components: Create custom components to use in the Shell app. However, this approach requires updating to the corresponding new version when Web Components change.
- JavaScript Bundles: Each micro frontend is built into static files to be executed in the Shell app.
- Module Federation: This feature allows micro frontends to be deployed independently and used like regular web applications. In the Shell App, it only requires remote loading (dynamic loading/lazy load) of the corresponding micro frontend modules needed for use.
- This feature is supported by Webpack and Vite. In this article, I will guide you on how to use Vite to build React Micro frontends.
Steps to Implement
First, after installing Vite, create two projects including a Shell app and a Component (used to implement the component that will be injected into the Shell app) as follows:
Above, I have created 2 React Vite projects using the Typescript template.
Next, let install the @originjs/vite-plugin-federation package for both newly created projects.
In the Component project, please create a file named `Input.tsx` with the following content:
The file `Button.tsx` with the following content:
Then, update the App.tsx file to use the components as follows:
Next, update the `vite.config.ts` file as follows:
- name: module federation name
- filename: the file name used by the Shell app to remote load
- expose: modules you want to expose
- shared: modules shared with the Shell app
Next, modify the `scripts` field in the `package.json` file as follows:
- dev: Since Vite starts with a random port, specify a specific port to allow the Shell app to dynamically load these modules.
- build: Add `tsc` to build the TypeScript project.
- start: First, build the Micro Frontend into static files, then start these assets so the Shell app can dynamically load them.
Next, modify the `package.json` file in the App shell similarly:
- dev: Used during the implementation process.
- start: Used when you want to build static files to deploy the web application.
Update the `vite.config.ts` file as follows:
Most of the fields are similar to those in the Component project. However, we add an extra field called `remotes` in a key-value format. The `key` is the alias for the remote module that will be used in the project, and the `value` is the URL to access the assets file (defined in the `vite.config.ts` file of the Component project).
Next, update the `App.tsx` file to use the remote module as follows:
You can see that `remote` is the value defined in the vite.config.ts file (Shell app), while Input and Button are components exposed from the Component project.
Since the project uses TypeScript, you'll encounter a "module not found" error when the TypeScript compiler runs. To resolve this, create a module.d.ts file to define the modules as follows:
Now, the configuration process for the Micro Frontend and Shell app to use the remote module is complete.
You can start the Component project like this:
You can see that Micro Frontends can also be started independently for development.
Next, start the Shell app:
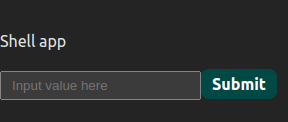
The Shell app successfully loaded the remote module for use.
Feel free to share your thoughts in the comments, and don't forget to like, share, and follow for more great content in the future!


Comments
Post a Comment